The daffodils have popped, the cherry blossoms are starting to unfurl, the redbud branches are breaking out in a rash of pink petals, and the weather alternates between 30 degrees and 70 on the same day, which can only mean that spring has arrived in DC. To celebrate my favorite equinox and the return of Persephone, i will tell you a tale of rebirth on the home front called Stairwell to Heaven.
Once upon a time, during The Hadean Age, and even for some time after the initial kitchen remodel, there was a stairwell from the kitchen that descended into the hellacious basement like a carpeted version of the River Styx. One passed from the relatively pleasant world of the now-remodeled kitchen -
- into a terrifying underworld:
Eventually the basement was also remodeled, but that's another story for another time. Flash forward several years and a new, beautiful stairwell in the back of the new addition rendered this one obsolete. This provided a tremendous opportunity to nearly triple my kitchen storage space, which had been the bane of my culinary existence. I had 7.5 kitchen cabinets total, 5 of which were dedicated for all the dishes, bakeware, pots, pans, glassware, storage containers, linens, and electrical devices. As a result, every item was stored like Russian nesting dolls. Getting any single item a multi-step process, and there was always the risk that in the process of obtaining it, the rest would cave in or come tumbling out.
So moving the stairs opened up a world of storage opportunity that i seized upon the moment the contractor finished screwing down the subflooring, whereupon i immediately started shopping for shelving and flooring options. After several trips to Ikea and The Container Store and every other place specializing in storage, i realized that the most economical and best construction option was to build the shelves myself from wire closet shelving hardware and oak boards (all the better to support a 40lb ice cream maker with, my dear).
So here is a step-by-step guide for converting your former stairwell into a heavenly kitchen pantry:
Shopping List
You will need: 4 wall brackets, 13 shelf supports, 4 oak boards precut into appropriate sizes by the really nice gentlemen at Home Depot, sufficient baseboard trim cut to your specs (this may require a compound miter saw, and if you want mine, i am probably about ready to part with it), about 20 ft2 vinyl flooring, a closet light of your choosing, an "old work" fixture box, a fishtape, some 14/2 gang NM wire, an electric drill, a compact, a flashlight, a Dremel (or a drywall saw), a utility knife, an voltage sensor, a wire cutter/stripper, needlenose and flat nose pliers, a screwdriver, various screws, and a level. You will also need appropriate paint for the walls and the shelves. Let me suggest grey and orange as the best color combination.
Oh, and one newly subfloored former stairwell:
Painting the Walls
If you need instruction on this, you should probably stop now, but either way, remember to do it first.
Installing the Flooring
Installing interlocking vinyl tile is like remedial Legos. Your children can probably do this faster than you (unless you still play with Legos and your children are not old enough to be handling a utility knife).
1) Pick the direction in which you want to lay your tile. I went from back to front and put a whole tile against the wall that would be exposed, and trimmed the tile against the wall that would be under the shelves.
2) Put down a piece of tile, put the next one in line so that the tabs and holes line up, and press them together so they lock and flatten.
3) If you need to cut a tile, use a straight edge and a utility knife to score the edge, then bend the tile back until it snaps along the score.
4) Repeat until done.
Installing the Shelves
1) Paint the precut oak shelves orange, because orange is the best color. You will probably need two coats of paint and it's best to put a clear coat of polycrylic on top to prevent marring and scratching. At least, that's what i recommend in light of thinking i could skip that step and now sorely regretting it but also being too lazy to bother with it at this point.
2) Hang the wall brackets. This will require figuring out where the wall studs are and putting at least one, but as many as possible so that they are screwed directly into wood. You can use heavy duty wall anchors, but they are a total pain in the ass. A stud finder is helpful for this, but wall studs are typically 16" on center, so if you find one, you can also measure from there. Your brackets should be relatively evenly spaced and you really don't want more than a couple of feet between them to prevent sagging.
3) Make sure the holes on the wall brackets line up and use a level to make sure they're straight both vertically and horizontally before predrilling all the holes and screwing everything in.
4) Put in the shelves and predrill holes in the bottoms before tightening the screws by hand.
Installing a New Light
It's likely that you have a lightswitch with power in your new pantry:
However, as the light it used to feed is now below the new pantry floor, it leaves your fabulous new pantry very dark:
This can be remedied quite simply by installing a new light. Do not be intimidated - this is a really easy project after you spend all day answering the question of why, when you ripped out the old light that was connected to aforementioned switch, there was no longer any power going to it, by retracing the 60 year old wiring and probably 20 year old jerry-rigged rewiring job to discover that the answer to this riddle was buried in an outlet box in the basement bathroom that you thankfully didn't drywall over and always wondered what was in there. No, it wasn't the first set of wires you encountered in there, but the set buried beneath the top wires, where you found the most insane connection between the feed, the old living room outlet, the switch in question and the old stairwell light. Methinks it would not have passed even 1948 wiring standards. But once you have rewired all of that - and i can guarantee this won't happen to you, so you'll get to skip all that - this is seriously only an hour-long project. And if you aren't trying to document it for a blog, it's probably only about 45 minutes.
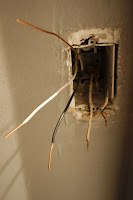
1) Pull out the old switch and use your voltage tester to determine where the power is coming in. You do this by holding the tester to the various wires while the switch is in the off position until the detector goes off. This should be a black wire, but sometimes the power gets reversed, in which case you will need to treat the white wire as "hot." Once you have identified the power in, label it and shut off the breaker feeding the switch. Disconnect the wires from the switch. (Note: if there are several wires coming into the box and some of them are red, this likely means that the switch is part of a 3-way switch with a common carrier. Take a look at this diagram. If the initial power feed is coming into this box (which should be a black, white and possibly copper wire (or no copper if it's old wiring, like mine), as depicted by the switch diagram on the left of the diagram (copper wire is depicted as green), you can still do this project. If all that's coming in is one set of wires and one is red, you are on the end of the line and while you can still run a light from here if you leave all the other wiring in place, it's more complicated and i'm not going to explain it here although if you really want me to, send me a note.)
2) Figure out where you want your light to go. I strongly suggest you put it above the switchbox, lest you lose a day ripping open drywall and drilling holes in studs.
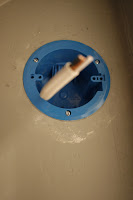
3) Use the new fixture box to trace a circle where you want the new fixture to go. Remember to use an "old work" box, because it has little tabs on it that will flare out when you tighten the screws and anchor it to the drywall. Also remember to use the back of the box (which is narrower) and not the front to trace the circle on the wall.
4) Use a Dremel or a wall saw to cut out the hole.
5) Look inside the hole you have cut to see if, by some insane miracle, the wiring for the old light runs up the wall.
5)(a) If the wire to the old fixture runs out of the old switch box and up the wall next to your new hole, hooray for you, you can opt to cut that bit of wire and use it for your new switch - just make sure to test it before you cut first because really, you can never be too sure that there isn't power running through a wire before you sink some metal pliers into it.
5)(b) In the more likely case that there is no wire next to your new hole you can do one of two things:
(i) You can pull the wire that runs from the box to the old fixture. This is probably going to require ripping up a bunch of drywall unless you managed to do it while the stairs were being ripped out and while spending an entire day retracing all the wiring.
(ii) You can put wire nuts on the ends of the old wire and curl them up into the back of the box. I suppose you don't even need to put the wire nuts on the ends, but it's always best not to have random bits of metal poking about where electric currents are involved. A note of caution - if there is something else (an outlet, another light, a switch) that was connected to your old light, it will no longer work. You can determine whether this is the case in advance by pulling out the old light. If there is only one set of wires coming into the fixture box, your old light is at the end of the line leading from your old switch and you're good to go. If there are two wires coming into the old light fixture box, it's likely that the other set leads to another switch at the bottom of your old stairs, in which case you're back to Option B, because you aren't going to care about the power to that old switch. Unless you want to repurpose it. In which case, you may need to do a lot more work or, better yet, you should hire an electrician. But let's assume the best case scenario and carry on.
6) If you've followed Option 5(b), you will need to run a wire from the switch box to your new light. To see if there's anything in the way, pull out your mirror and a flashlight and use it to look down into the hole. Hopefully you will see this:
This is a view in the mirror of the top of the unimpeded switch box below, meaning running the wire will be a breeze. (By the way, I'd like you to know that getting this picture was the longest step of the entire project and required me to use the mirror and the flashlight with one hands like unwieldy chopsticks, manually focus my lens and take the shot with the other, all while balancing atop a folding chair. I am still amazed that my flashlight didn't end up at the bottom of the hole, so a little applause here would be appreciated.
7) Okay, back to the switch box. If your box is old metal, you'll have to pull out the old wire holder and knock out one of the openings in the back with a screwdriver. If it's plastic, you can just pry open one of the openings with a screwdriver or simply pushing the wire through it.
8) Cut an appropriate length of 14/2 wire (you'll need 8" sticking out of both boxes) and feed it through the back of the switch box up through the hole and into the fixture box. Push the fixture box into the hole and secure to the wall by tightening the screws.
9) Remove the sheath from the wire and use wire strippers to strip approximately 1/2" at the end of each wire.
10) Twist the neutral (white) wires together with the flatnose pliers and put a wire nut on the end. Curl the pair up into the back of the box.


10) Connect the power feed coming in (black) to the terminal (usually the bottom screw) and the black wire going to the light fixture to the other terminal (usually the top screw). In new switches you can push the wires into small holes on the back of the switch if you prefer, or you can use the wire nose pliers to curl the ends first and then popping them over the screws before tightening down. Connect the copper ground wire to the green screw.


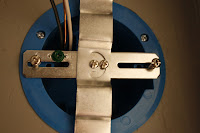
11) Remove sheathing and strip wire for light fixture. Take bracket from light fixture and screw it to box. Create a pigtail by cutting a short piece of NM wire, removing the sheath and using the copper wire only. Connect one end of the pigtail to the green screw on the bracket and twist the other end of the pigtail together with the copper wire you've run into the box.
12) Twist the copper ground wire from the fixture around the twisted copper wires and secure with a wirenut. Because fixture wires are usually a smaller gauge you can usually do this with your fingers, but if for some reason they are thicker, you should twist all three wires together with the pliers at the same time. Connect the white wires and black wires together and secure with wirenuts.

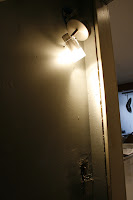
13) You are ready to test your fixture by turning the circuit back on and flipping the switch. If it goes on, pat yourself on the back, go turn off the circuit and screw the fixture and switch to the boxes. Turn circuit back on. Bask in the glow of your new light.
Finishing Touches
Cut the baseboard trim and paint it orange, because it's the best color. Nail to the wall. Buy 10 different floor transitions until you find the magic one that hides the gap between the two different floors. Buy some Ikea storage bins and 4 casters per bin. Drill holes and attach casters to bins. Slide bins under shelves. Put up weird Ikea curtain panel system in doorway to deter the kitty from curling up on one of the new shelves. Move all your beloved kitchen wares into their luxurious new home. Celebrate by making danishes. Well, that's what i did, anyway. You might want to do something more rational, like drink heavily.


1 comment:
Post a Comment